Other Versions
Find Any File is Shareware
You may try it out without buying first. Simply download it from this website (but not from the App Store).
If you keep using it you are expected to pay for it, though.

Find Any File (FAF)
Key Features
- Convenient folder and icon views for results
- Can search in other users' home folders ("root" mode)
- Searches can be saved for easy re-use
- Can be launched with a self defined keyboard shortcut
Links
New in version 2.6:
- AppleScriptable.
- Columns for Comments, Trashed, Hidden.
- Finding Comments is more reliable.
New in version 2.5:
- Adds a Name without Extension rule.
- Can search modern Time Machine backups (APFS snapshots)
- Faster search on Synology and QNAP, as well as on Windows shares with Everything.
- New script for finding duplicate files.
New in version 2.4:
- Scriptable rules for powerful and complex searches.
- File content search now finds text inside zip files, including .docx (Word) and .xlsx (Excel) files
- Support for Default Folder X and BBEdit.
- See the Version History for a detailed list of changes.
Setting up SSH access on your file server for on-server searches
This page provides information about enabling "ssh find" search to work on various types of file servers.
Note: This feature requires a Pro license and FAF version 2.5.
Note: To find out your server's network address (you'll need that below), go to Finder, type cmd-shift-C to see all your volumes, select the mounted network volume and type cmd-I to open the Info window. Look for "Server:", which shows smb://xxx.local/VOLNAME or afp://xxx.local/VOLNAME. The address is that the part between "//" and the next "/" - in this example it would be "xxx.local". You can also use the IP address instead, such as "192.168.1.102".
Enable SSH on your server
Synology
Log in to the Web interface of your NAS. If your NAS is called "Syno", then http://syno.local:5000 might work.
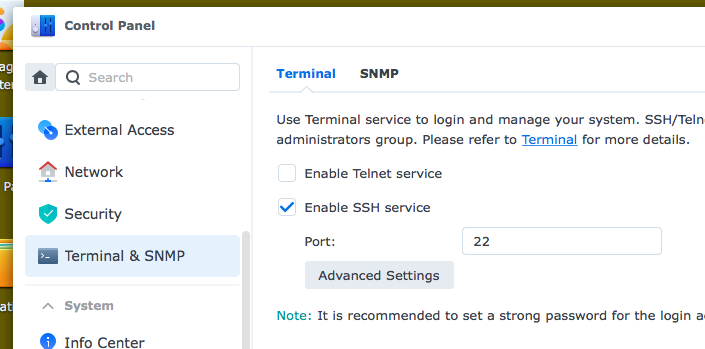
Open the Control Panel app, go into Terminal & SNMP and enabled SSH access there:
See also:
If you want to enable passwordless (key-based) login, you also need to enable "Home Folders" on the NAS. In the Web UI, go to: Control Panel - Users & Group - Advanced tab - check Enable user home service. And to hide the "homes" share: Control Panel - Shared Folder - select "homes" folder - Edit - General tab - check Hide this shared folder in 'My Network Places'
Proceeed to the section titled Set up FAF to use the SSH access.
QNAP
Log in to the Web interface of your NAS. If your NAS is called "QNAP", then http://qnap.local:8080 might work.
Open the Control Panel app, go into Telnet / SSH (found under Network & File Services) and enabled SSH access there:
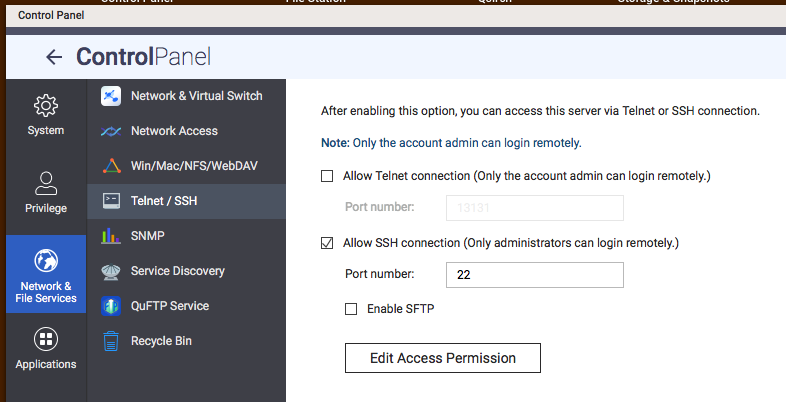
Next, click Edit Access Permission below it and give your user access to SSH. Don't forget to click Apply.
See also:
- Login to SSH as a regular user, i.e. not as an admin user.
If you want to enable passwordless (key-based) login, you also need to enable "Home Folders" on the NAS. In the Web UI, go to: Control Panel - Users - Advanced Settings - Home Folder - check Enable home folder for all users. To hide the "homes" share: Control Panel - Shared Folders - "homes" folder: Edit Properties - check Hide network drive.
Proceeed to the section titled Set up FAF to use the SSH access.
WD My Cloud
Log in to the Web interface of your NAS. If your NAS is called "MyCloud", then http://mycloud.local might work.
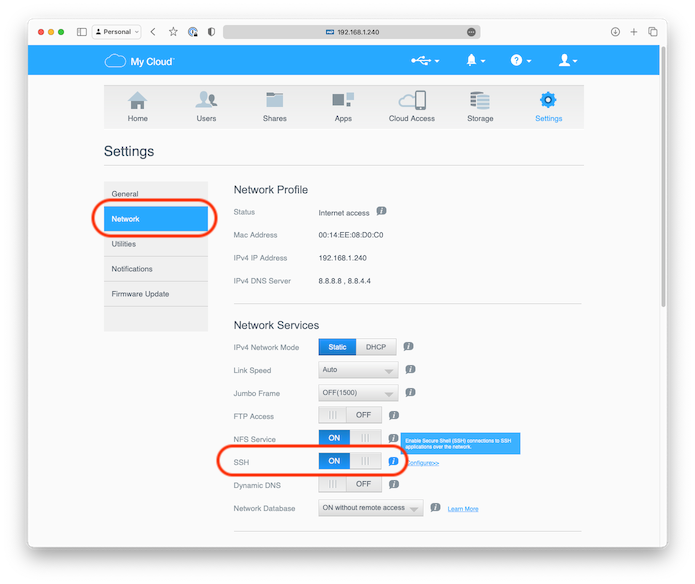
Click on the left side into the section "Network". Then scroll the view down until you find the switch for "SSH". Turn that on:
Proceeed to the section titled Set up FAF to use the SSH access.
Other systems
Please consult the server's manual or ask the web for help with enabling SSH access to your server.
Set up FAF to use the SSH access
Verify SSH access
After enabling SSH on the server, it's best to make sure you can login. To do that, open Terminal.app (inside your Mac's Utilities folder) and enter this command (remember to press the Return key after entering any command):
ssh USER@ADDRESS
Replace USER with your user short name (usually the same that you use to login to the file server to mount volumes, but always "sshd" for WD MyCloud devices), and replace ADDRESS with your server's network address.
The first time you do this, you might get asked to confirm the connection. Type "yes" and Return.
Note: If you get asked for a password when logging into the server with ssh, FAF will save that for you in the next step so that you won't have to retype it each time you search with FAF, but it may slow down the initial connection to the server. Ideally, you would set up a password-less login method using public key encryption. Once you've done that, you can also store your private key's passphrase in your Keychain so that you won't have to enter that any more, either.
Set up or check FAF's server access settings
First, mount the network volume(s) you want to search with FAF's SSH mode, and launch FAF so that the app sees the mounted volumes.
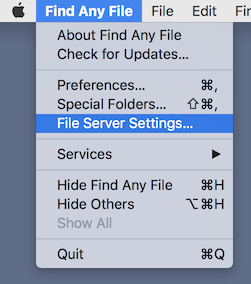
Then open the File Server Settings from FAF's menu:
This will open the File Server Settings window:
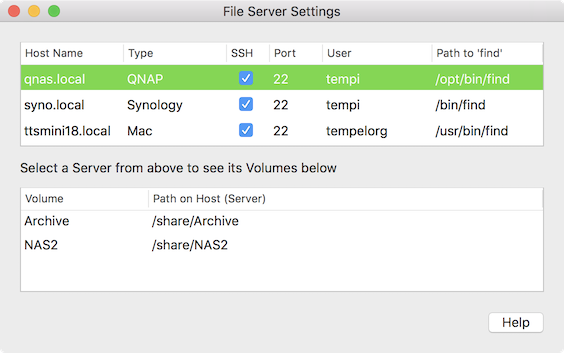
Note: If the window does not show the SSH checkbox and other columns that are shown in the picture above, then you need to make them visible by setting the hidden preference "Show Pro options" to YES first, then restart FAF.
To use SSH with a server, tick the checkbox in its SSH column. (If you do not see the server here, first mount its volume(s) in Finder.)
If you do not see any servers here, then first mount your network volumes on your Mac, so that FAF can see them.
This will show a confirmation dialog in which you can alter the SSH user name and the port for the SSH server (it's usually 22).
You can also tick the Reset All checkbox to reset all previously settings, in case you had altered them manually or if the server got replace with a different model or upgraded with new software.
If you continue with the Login, FAF will attempt to connect to the server and gather the specifics of the server, then fill in the values for "Type" and "Path to 'find'", as well as the "Path on Host" for each known volume.
The Type field helps FAF deciding whether it needs to apply special work-arounds, mainly when searching on the device via Spotlight. Values currently known to FAF start with "QNAP" or "Syno".
The Path to 'find' field specifies which find tool is to be used (for instance, QNAP comes with a rather old and limited find tool – which you can replace with a better one by installing Entware. Once you have done that, update the path to /opt/bin/find or disable and re-enable SSH and tick the **Reset All* checkbox in order to determine the new find tool's location).
If you select a server, the second list below will show all known volumes (i.e. those that were mounted when you ran FAF in the past or now). Each volume has a Path to Host entry that specifies where the volume's shared directory is located on the server. For Synology, it's usually under /volume1, for QNAP under /share, for WD My Cloud under /shares and for macOS servers under /Volumes.
If you run into problem, it might help to have a look at the Log File (see Help menu).
Test FAF's SSH access
Make sure that you have a Pro license installed by opening FAF's About window from the menu bar. It should mention "Pro license(s)" under your name.
In a Find window, select your network volume as the search location, and use a file name rule, such as "Name contains x". Once you click the Find button, the search should start, and you can see something like Search VOLNAME (sshf) in the bottom left area of the Find window. The sshf is the indicator that the search uses SSH. If you see enum, then the login failed for some reason. See the previous section for checking the settings.
If the search showed "sshf", then you're set. Any subsequent searches on the same volume will automatically use this fast find method whenever you include a Name, Extension or a Modification Date rule in your search.